Trailmakers Tutorial: Build Your First Working Vehicle
Use this Trailmakers tutorial to build a working vehicle, configure steering, reduce drag, and troubleshoot your cars, boats, and planes. Start building.
Jump to
How to Get Started in Trailmakers
Build a simple car before tackling a transforming jet. This Trailmakers tutorial walks you through the building tools, block settings, and physics displays that help turn an idea into a controllable vehicle. Learning how to diagnose one steering or balance problem makes your next creation much easier to improve.
Choose Sandbox to experiment with vehicle designs, or play Pioneers for missions that unlock new parts as you progress through different environments. Pioneers supports solo play and multiplayer, so you can work through its vehicle challenges with friends.
For your opening project, keep the goal small:
- Start with a basic car. Use four wheels and an engine as your starting point, and leave elaborate mechanisms for later.
- Keep the Controls tab visible. Its prompts change with your selection and input device, helping you find the relevant building actions.
- Inspect the engine configuration. Engines automatically connect to every wheel on a creation; select which wheels receive power when you want to change that arrangement.
- Test movement and steering. Make a short drive, identify one problem, and return to the builder to adjust it.
- Add visual details after the vehicle handles well. Symmetry tools also work with painting and decals, so you can carry the same workflow into decoration.
Premade vehicles and community blueprints are useful learning tools, too. Select their engines, hinges, and other functional blocks to inspect how their settings fit together.
Official page: Trailmakers (playtrailmakers.com)
Build Faster With Copying, Multiselect, and Symmetry
Copying becomes especially useful once a vehicle contains repeated assemblies. Select several blocks together to duplicate a complete section instead of rebuilding every piece.
 Image: Steam / Flashbulb
With a mouse and keyboard, hold Ctrl while clicking blocks to add them to a selection. You can also select groups by dragging over them. Use the copy action to duplicate the selected block or group.
Camera position matters: your viewing angle affects the direction in which the copy appears. If a duplicated assembly lands somewhere unexpected, reposition the camera before trying again.
For mirrored copies, move the camera to the opposite side of the group. The assembly also needs a suitable block connection point to mirror from.
Use symmetry throughout the build
Symmetry mode mirrors your edits across the creation. Enable it when building matching sides of a car, boat, or aircraft, and keep it available when applying colors and decals.
After mirroring moving parts, check their configured directions. The hinge arrows show which way each input moves the mechanism, making them useful for catching mismatched behavior before testing.
Turn on the camera option that focuses on your selected block when working on distant sections. If a moved block slips away from the camera’s focus, zooming in and out can recenter the view without replacing it.
Configure Blocks Before Adding More Parts
A vehicle that behaves strangely often needs a configuration adjustment. Select the relevant block and open its configuration options before adding another engine, thruster, or mechanism.
 Image: Steam / Flashbulb
Different blocks expose different settings. Start by understanding what each adjustment controls.
Hinges and steering
Hinges display green and red arrows for their two movement directions. For logic inputs, green represents positive input and red represents negative input.
The main hinge settings include:
- Angle: Sets how far the hinge moves. Small hinges allow up to 90°, while large hinges allow up to 60°.
- Speed: Controls how quickly the hinge moves.
- Strength: Changes its stiffness.
- Steering help: Slows steering movement relative to vehicle speed, helping limit abrupt steering at higher speeds.
- Hold position: Leaves the hinge where you release it instead of returning it to center.
- Toggle: Keeps an input active until you press its assigned control again.
If steering becomes difficult at speed, inspect steering help and reduce the steering angle as a test. Adjust these separately so you can tell which change improves handling.
Engines, propellers, and thrusters
Engine configuration lets you choose the powered wheels. Inspect this selection when troubleshooting a drivetrain or experimenting with how your car delivers power.
Propellers and thrusters have output settings that let you adjust their maximum power. Reduce output when testing whether excessive thrust is contributing to a control problem.
Gimbal thrusters behave differently: they provide thrust along the world’s vertical Y axis. Positive power produces upward thrust, and negative power produces downward thrust. Account for that behavior when designing a vehicle that changes orientation.
Pistons and seats
A piston’s start position determines how compressed it is when spawned. Its auto-reset option can return it to that starting position, while toggle inputs change how you activate its movement.
Seats also have configuration options. Their built-in flight controls simulate shifting the pilot’s weight to influence pitch and roll, with less effect on heavier creations. Inspect the seat’s control access settings when checking which functional blocks it can operate.
Read Drag and Force Displays to Diagnose Problems
The builder includes aerodynamic and force displays that make handling problems easier to investigate.
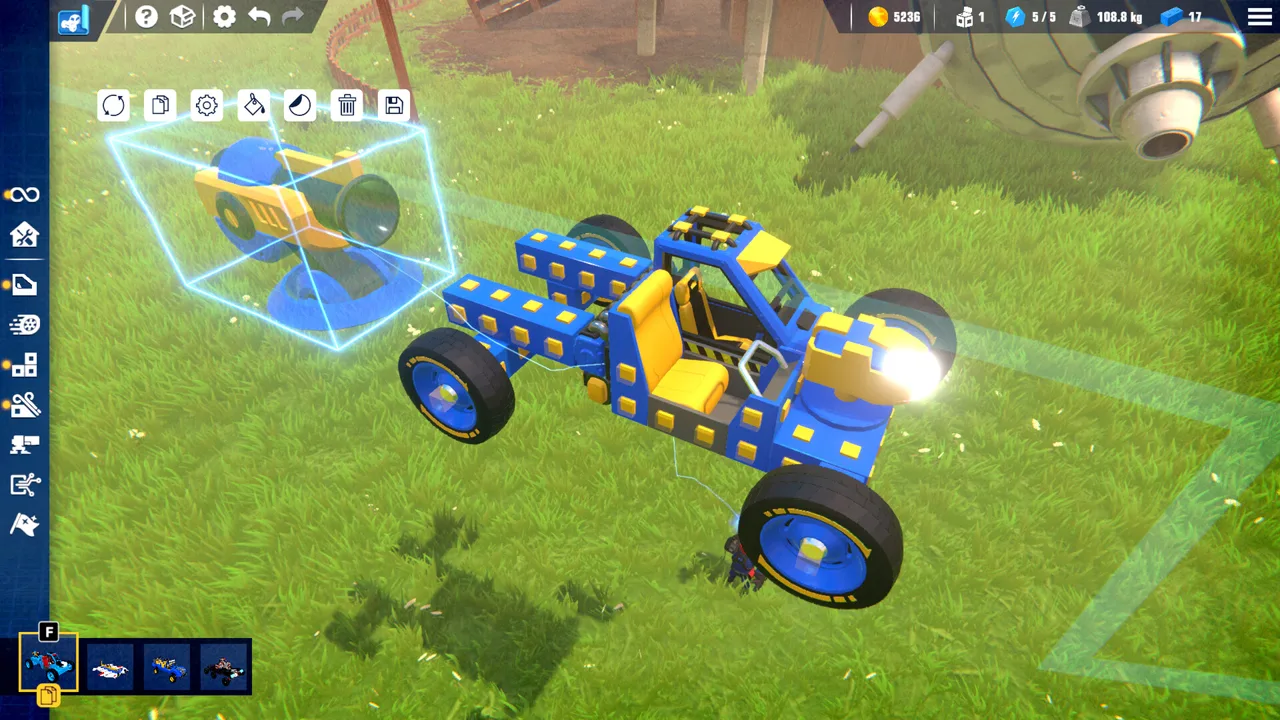 Image: Steam / Flashbulb
Enable the aerodynamic display to examine airflow arrows around your creation. Bright green indicates low drag; red indicates high drag. Use those colors to identify exposed shapes worth changing when you are trying to gain speed.
Make a small shape adjustment, then test again. Adding power while leaving a drag-heavy design untouched makes it harder to understand what is limiting performance.
Compare weight, lift, and drag
Force markers show where forces act relative to your creation. For aircraft, compare the center of mass with the center of lift while working on balance.
These markers represent the vehicle’s arrangement in build mode. A creation that changes shape through hinges, pistons, or advanced glitch techniques needs testing in its operating configuration.
Watch the upper HUD as well. It displays information including weight, block count, power-core use, and the racing league associated with the build.
Block count and complexity measure different things. Functional parts can contribute more complexity than a simple structural block, so inspect both when expanding a mechanism-heavy creation.
Check inputs when the wrong part activates
Open the input display when pressing a control produces an unexpected response. Inspect every block assigned to that input.
For example, if a strafe command also activates reverse thrusters, review those thrusters’ bindings. Correcting the assignments directly addresses the unwanted movement.
Move From Cars to Boats and Planes
Water and flight introduce new forces, but the same build-and-test process still applies. Carry over your knowledge of symmetry, block configuration, and weight distribution.
Turning a land vehicle into a boat
A car needs changes to work on water. Build a hull, add flotation, and fit propulsion suited to the new vehicle.
Test whether it floats properly before concentrating on speed. Keep flotation balanced across the creation, and inspect weight distribution if one side sits noticeably lower.
Once the hull behaves predictably, adjust propulsion and test steering. Change one system at a time so each test answers a specific question.
Troubleshooting an aircraft
Use the force markers to inspect balance before repeatedly attempting takeoff. Check whether heavy components are creating a lopsided design, especially after mounting weapons or other large additions.
Keep matching wings and other paired components symmetrical. If adding equipment changes the aircraft’s behavior, compare its new weight distribution with the previous arrangement.
For a heavy aircraft, inspect the dedicated control mechanisms rather than relying entirely on the seat’s weight-shifting controls. Their influence decreases as the creation gets heavier.
Learn Basic Automation With Timing and Sensors
You can experiment with automation through block settings before building a large logic system.
Hinges include timing controls that support repeating movement:
- Delay sets the wait between receiving an input and responding.
- Duration determines how long the activation lasts.
- Pause sets the interval before the sequence repeats.
Use these settings to experiment with a simple moving assembly. Adjust one timing value at a time, then observe how it changes the motion.
For a continuous signal, use an altitude sensor set to its lowest depth threshold and connect it to the block you want to activate. It supplies an ongoing signal while the creation remains above that threshold; the deepest ocean floor is an exception.
That signal can keep lights active or hold a hinged surface at an angle. When driving a hinge through logic, choose a positive or negative signal to match its green or red direction.
Organize Blueprints and Set Up Your Next Test
Keep recognizable blueprint names as your collection grows. Include the vehicle type and a meaningful design detail so you can distinguish similar creations.
Transform slots let you switch quickly between assigned vehicles. On mouse and keyboard, hold R, highlight the blueprint, and press the number key you want to assign. With a controller, highlight a blueprint and use the displayed transform-slot prompts to assign it to a D-pad direction.
Once your car handles consistently, take it to Race Island. Its 14 races have global leaderboards, and racing against your own ghost helps reveal where you lose time. Use those runs to test a specific change, such as steering response or reduced drag.
For shared experiments, multiplayer supports playing with friends, including in the main story. Compare creations with friends, inspect how their mechanisms work, and upload a finished blueprint when you are ready to share it.
Continue with
 Trailmakers Build Mode: Build Better Cars and PlanesMaster Trailmakers build mode with useful tips for symmetry, hinges, pistons, and vehicle shaping. Build cleaner boats, planes, and cars with fewer errors.
Continue exploring
Trailmakers Map Guide: Explore Worlds and City Roads
Find your next Trailmakers map, explore New Torque City, compare campaign worlds, and learn what update 2.5.3 changed for driving, races, and sandbox play.
Trailmakers Crossplay: Who Can Play Together on PC?
Trailmakers crossplay connects Xbox and Microsoft Store PC players. Learn which versions work together, where Steam fits, and multiplayer lobby limits.
Join the community
Official channels for news, updates and player help: